Skip List

1. overview

  • Skip List是一种经过优化的链表,通过存储了冗余的节点作为跳板指针,提供了O(logn)的增删改查效率
  • 结构与算法过程较红黑树更容易理解,实现也更简单

  • 如果某一层拥有某节点,则其下每一层均有该节点,之间存在指针关联,例如3,5
  • 链表的层数在插入节点时有机会更新,采用丢硬币方法,如果产生的新层数newLevel比原始层数level大,则加一层并且且在新层及其以下层均插入节点,否则,在newLevel至底层间所有层插入节点

存储结构如图所示,红色线条代表查询路径,在跳板指针的帮助下,直接跳过了大部分节点,很容易的可以写出搜索代码

首先给出基础的节点定义与变量:

1
2
3
4
5
6
7
8
9
10
11
12
13
14
15
16
17
18
19
20
21
22
23
24
25
26
27
28
29
30
31
32
33
34
35
36
37
38
39
40
41
42
43
44
45
46
47
48
49
50
51
52
53
54
55
56
57
58
59
60
61
62
63
64
65
66
67
68
69
70
71
//当前跳表层数
private int level = 1;
//头节点的key
private static final int HEAD_KEY = Integer.MIN_VALUE;
//节点数
private int count = 0;
private Random r;
private static final double PROBABILITY = 0.5;//向上提升一个的概率
//顶层指针
private Node top;
//底层链表指针
private Node bottomHead;
/**
* 跳表的节点定义
*/
private class Node {
Node next;
Node down;
int key;
V value;
int level;
public Node() {
}
public Node(int key, V value) {
this.key = key;
this.value = value;
}
public Node(int key, V value, int level) {
this.key = key;
this.value = value;
this.level = level;
}
public Node(Node node, int level) {
this.key = node.key;
this.value = node.value;
this.level = level;
}
public Node(Node node) {
this.key = node.key;
this.value = node.value;
}
}
/**
* 初始化
*/
private void initList() {
//空表 初始化
top = new Node(HEAD_KEY, null);
bottomHead = top;
}
/**
* 确定新的层数,随机丢硬币
*
* @return
*/
private int newLevel() {
int level = 0;
while (r.nextDouble() > PROBABILITY) {
level++;
}
return level;
}

2. 查找

1
2
3
4
5
6
7
8
9
10
11
12
13
14
15
16
17
18
19
20
21
22
23
24
25
26
27
/**
* 查找节点
*
* @param key
*
* @return
*/
public Node find(int key) {
Node p = top;
if (p == null) {
return null;
}
while (true) {
while (p.next != null && p.next.key <= key) {
p = p.next;
}
if (p.down != null) {
p = p.down;
} else {
break;
}
}
if (p.key == key) {
return p;
}
return null;
}

3. 插入

  • 如图红色区域所示,插入节点的核心思想,找到需要插入层的新节点位置之前的指针,循环指针完成指针指向即可
  • 插入节点之前需要确认新的随机层数,之后找到开始插入的层,由上到下
  • 注意不要使用每一层都重新查找的方式进行节点插入,可行,但是速度极慢
    1
    2
    3
    4
    5
    6
    7
    8
    9
    10
    11
    12
    13
    14
    15
    16
    17
    18
    19
    20
    21
    22
    23
    24
    25
    26
    27
    28
    29
    30
    31
    32
    33
    34
    35
    36
    37
    38
    39
    40
    41
    42
    43
    44
    45
    46
    47
    48
    49
    50
    51
    52
    53
    54
    55
    56
    57
    58
    59
    60
    61
    62
    63
    64
    65
    66
    67
    68
    69
    70
    71
    72
    73
    74
    75
    /**
    * 插入
    *
    * @param value
    *
    * @return
    */
    public Node insert(int key, V value) {
    List<Node> noteToUpdate = Lists.newArrayList();
    //迭代各层寻找需要插入key节点的前置节点,放入List
    Node p = top;
    while (true) {
    while (p.next != null && p.next.key <= key) {
    p = p.next;
    }
    noteToUpdate.add(p);
    if (p.down != null) {
    p = p.down;
    } else {
    break;
    }
    }
    //查询是否存在,如果存在,最后一个节点一定是
    Node lastOne = noteToUpdate.get(noteToUpdate.size() - 1);
    if (lastOne.key == key) {
    return lastOne;
    }
    //新层数,如果比现在大,就赋值1,增加一层,否则根据随机值向下寻找插入节点的首层
    int newLevel = newLevel() - level;
    newLevel = newLevel > 0 ? 1 : newLevel;
    Node headNode = top;
    //新层数小于当前层,则从高层开始,每层插入节点即可
    while (newLevel != 0) {
    if (newLevel > 0) {
    Node oldHead = headNode;
    headNode = new Node(HEAD_KEY, null, oldHead.level + 1);
    headNode.down = oldHead;
    top = headNode;
    level++;
    newLevel--;
    //增加新层,则要插入的节点需要增加,放在List头部,节点就是新headNode
    noteToUpdate.add(0, headNode);
    continue;
    }
    if (newLevel < 0) {
    if (headNode.down != null) {
    headNode = headNode.down;
    //插入层向下移动,则要插入的节点需要减少,从头开始减少
    noteToUpdate.remove(0);
    }
    newLevel++;
    }
    }
    //循环各个需要插入的节点进行插入,并配置向下指针
    //此处从末尾节点开始,方便配置down指针
    Node bottomNode = null;
    for (int i = noteToUpdate.size() - 1; i >= 0; i--) {
    Node pre = noteToUpdate.get(i);
    Node preNext = pre.next;
    Node node = new Node(key, value, pre.level);
    pre.next = node;
    node.next = preNext;
    node.down = bottomNode;
    bottomNode = node;
    }
    count++;
    return null;
    }

4. 更新

  • 如图蓝色路径显示,找到该节点,从上到下更新即可
1
2
3
4
5
6
7
8
9
10
11
12
13
14
15
16
17
18
19
20
21
22
23
24
25
26
27
28
29
30
31
32
33
34
35
/**
* 更新
*
* @param key
*
* @return
*/
private Node update(int key, V value) {
Node p = top;
while (true) {
while (p.next != null && p.next.key <= key) {
p = p.next;
}
if (p.key == key) {
break;
} else {
if (p.down != null) {
p = p.down;
} else {
p = null;
break;
}
}
}
if (p == null) {
return null;
}
Node updated = p;
while (p != null) {
updated = p;
p.value = value;
p = p.down;
}
return updated;
}

5. 删除

  • 如图紫色路径显示,找到该节点的所有前驱,从上到下更新指向下一个节点即可
  • 同时需要处理空层,将其去除
1
2
3
4
5
6
7
8
9
10
11
12
13
14
15
16
17
18
19
20
21
22
23
24
25
26
27
28
29
30
31
32
33
34
35
36
37
38
39
40
41
42
43
/**
* 删除
*
* @param key
*
* @return
*/
private void delete(int key) {
Node p = top;
Node head = p;
List<Node> noteToUpdate = Lists.newArrayList();
List<Node> headTodelete = Lists.newArrayList();
while (true) {
while (p.next != null && p.next.key < key) {
p = p.next;
}
if (p.next != null && p.next.key == key) {
noteToUpdate.add(p);
}
headTodelete.add(head);
if (p.down != null) {
p = p.down;
head = head.down;
} else {
break;
}
}
Node old;
for (Node node : noteToUpdate) {
old = node.next;
node.next = old.next;
//释放指针
old.next = null;
old.down = null;
}
for (Node headNode : headTodelete) {
if (headNode.next == null && null != headNode.down) {
top = headNode.down;
}
}
}

6. 打印跳表结构

1
2
3
4
5
6
7
8
9
10
11
12
13
14
15
16
17
18
19
20
21
22
23
24
25
26
27
28
29
30
31
32
33
34
35
36
37
38
39
40
41
42
43
44
45
46
47
48
49
50
51
52
53
54
55
56
57
58
59
60
61
62
63
64
65
66
67
68
69
70
71
72
73
74
75
76
77
78
/**
* 打印跳表结构
*
* @return
*/
private void showNodes() {
List<V> values = Lists.newArrayList();
Node headFirst = bottomHead.next;
while (headFirst != null) {
values.add(headFirst.value);
headFirst = headFirst.next;
}
Node head = top, p;
while ((p = head) != null) {
int lineSepratorCount = 0;
List<Integer> downPointer = Lists.newArrayList();
while (p != null) {
if (p.key == HEAD_KEY) {
System.out.print("HEAD");
} else {
//计算这个value在底层链表中的索引
int valueIndex = values.indexOf(p.value);
//计算本次输出需要输出的-----> 如果是底层就是1,如果不是就是本次value序号减去当前行已经输出的---->
int sepratorCount = head == bottomHead ? 1 : valueIndex + 1 - lineSepratorCount;
//保存需要输出竖线的索引
downPointer.add(valueIndex);
//更新并输出---->
lineSepratorCount = lineSepratorCount + sepratorCount;
for (int i = 0; i < sepratorCount; i++) {
//如果不是紧接着数值的输出,多输出一个-,用于补位
if (sepratorCount > 1 && i < sepratorCount - 1) {
printChar(1, '-');
}
printChar(4, '-');
System.out.print(">");
}
System.out.print(p.value);
}
p = p.next;
}
head = head.down;
//输出竖线
if (head != null) {
System.out.println();
//补位HEAD的输出,输出头节点之间的竖线
System.out.print(" | ");
//输出竖线,如果当前索引在需要输出竖线的List中,则输出竖线,否则输出6个空格
for (int i = 0; i < lineSepratorCount; i++) {
printChar(5, ' ');
if (downPointer.contains(i)) {
System.out.print("|");
} else {
printChar(1, ' ');
}
}
System.out.println();
}
}
System.out.println();
}
/**
* 输出空格
*/
private void printChar(int num, char cahr) {
for (int i = 0; i < num; i++) {
System.out.print(cahr);
}
}

7. 测试

  • 插入应该仍有优化空间
    1
    2
    3
    4
    5
    6
    7
    8
    ArrayList插入时间:174ms , 数量:5000000
    ArrayList搜索时间:18ms
    LinkedList插入时间:2991ms , 数量:5000000
    LinkedList搜索时间:31ms
    SkipList插入时间:3717ms , 数量:5000000,层数:22
    SkipList搜索时间:0ms
    RBtree插入时间:1583ms , 数量:5000000
    RBtree搜索时间:0ms

红黑树

1. overview

  • 红黑树是一种二叉搜索树 点击查看
  • 红黑树实现了一种自平衡,可叫做一种平衡二叉查找树,但其并非完全平衡
  • 在O(log n)时间内做查找,插入和删除
  • 新插入的节点默认都是红色,之后进行插入修复
  • 红黑树的平衡实现靠插入与删除节点后根据颜色规则进行的重新修复
  • 红黑树的红黑规则,按照此规则调整数结构即可保持相对平衡

    1)每个结点要么是红的,要么是黑的。
    2)根结点是黑的。
    3)每个叶结点(叶结点即指树尾端NIL指针或NULL结点)是黑的。
    4)如果一个结点是红的,那么它的俩个儿子都是黑的。
    5)对于任一结点而言,其到叶结点树尾端NIL指针的每一条路径都包含相同数目的黑结点。

  • 红黑树的基本操作要点:(查询与插入节点、删除节点与二叉搜索树一致)

    • 左旋转
    • 右旋转
    • 插入后修复
    • 删除后修复

2. 旋转

  • 旋转是红黑树动态调整保持相对平衡的实现方式

    2.1 左旋转

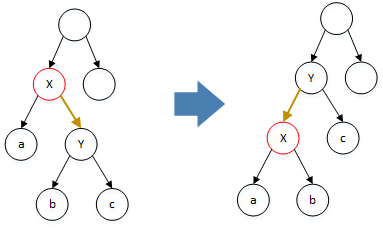
  • 如果以X为旋转点,则左旋的含义就是以XY之间连线为轴将重心左移,类似跷跷板,同时保证二叉搜索树的基本性质,所以b节点重新挂在X右下

  • 详细分解图解析算法步骤,图中线段序号为操作方式顺序,虚线为断开
    1)将Y的左孩子b连接到旋转节点X右孩子,线1
    2)设置Y左的父亲为X,线2,3
    3)Y的父亲设置为X的父亲 线4,5
    4)如果X是其父左,将Y设置为其父左,否则设置为右 线4,5
    5)设置Y的左为X,X的父为Y x线6
    6)结束
1
2
3
4
5
6
7
8
9
10
11
12
13
14
15
16
17
18
19
20
21
22
23
24
25
26
27
28
29
30
31
32
33
34
35
36
/**
* 左旋转
*
* @param root
* @param p
*
* @return
*/
static TreeNode rotateLeft(TreeNode root, TreeNode p) {
TreeNode pRight, pRightLeft, pParent;
if (p != null && (pRight = p.right) != null) {
//右边节点左孩子至旋转点右侧
pRightLeft = p.right = pRight.left;
if (pRightLeft != null) {
pRightLeft.parent = p;
}
//将旋转节点的父节点赋予旋转节点右边节点父节点
pParent = pRight.parent = p.parent;
if (pParent == null) {
//如果旋转节点父为空,表示其为root,直接赋给root变黑
root = pRight;
root.red = false;//root必须为黑节点
} else if (pParent.left == p) {
//父节点存在且旋转节点为左节点,则将其右接在父左
pParent.left = pRight;
} else {
//否则就是右边
pParent.right = pRight;
}
//旋转节点链接至旋转节点的右孩子
pRight.left = p;
p.parent = pRight;
}
return root;
}

2.2 右旋转

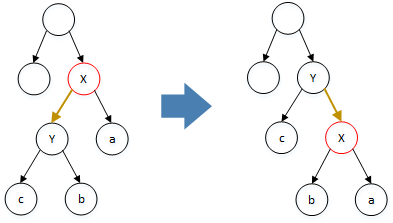
参照左旋转分解同理可写出右旋的代码:

1
2
3
4
5
6
7
8
9
10
11
12
13
14
15
16
17
18
19
20
21
22
23
24
25
26
27
28
29
30
31
32
33
34
35
36
/**
* 右旋转
*
* @param root
* @param p
*
* @return
*/
static TreeNode rotateRight(TreeNode root, TreeNode p) {
TreeNode pLeft, pLeftRight, pParent;
if (p != null && (pLeft = p.left) != null) {
//左边节点右孩子至旋转点左侧
pLeftRight = p.left = pLeft.right;
if (pLeftRight != null) {
pLeftRight.parent = p;
}
//将旋转节点的父节点赋予旋转节点左边节点父节点
pParent = pLeft.parent = p.parent;
if (pParent == null) {
//如果旋转节点父为空,表示其为root,直接赋给root变黑
root = pLeft;
root.red = false;//root必须为黑节点
} else if (pParent.right == p) {
//父节点存在且旋转节点为右节点,则将其右接在父右
pParent.right = pLeft;
} else {
//否则就是左边
pParent.left = pLeft;
}
//旋转节点链接至旋转节点左孩子
pLeft.right = p;
p.parent = pLeft;
}
return root;
}

3. 插入

3.1 节点插入

红黑树的节点插入与二叉搜索树一致,找到位置接入即可,注意其接入的节点都是叶子节点

1
2
3
4
5
6
7
8
9
10
11
12
13
14
15
16
17
18
19
20
21
22
23
24
25
26
27
28
29
30
31
32
33
34
/**
* 插入
*
* @param root
* @param node
*
* @return
*/
static TreeNode insert(TreeNode root, TreeNode node) {
TreeNode checkPoint = root, insertPoint = checkPoint;
int value = node.value;
while (checkPoint != null) {
//最后检查点指向最后的一个叶子节点,新节点在其左或右
insertPoint = checkPoint;
if (checkPoint.value > value) {
checkPoint = checkPoint.left;
} else {
checkPoint = checkPoint.right;
}
}
node.parent = insertPoint;
if (insertPoint == null) {
//空树
root = node;
} else if (insertPoint.value > value) {
insertPoint.left = node;
} else {
insertPoint.right = node;
}
node.left = node.right = null;
node.red = true;
return root;
}

3.2 插入后的修复

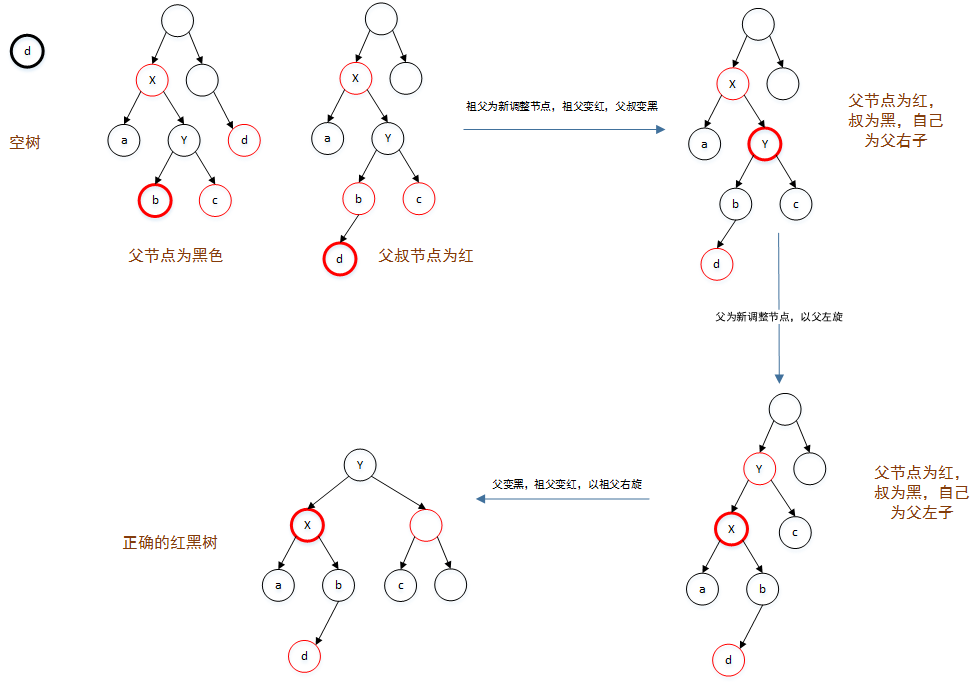
  • 二叉搜索树在节点的插入之后,树的平衡性会遭到破坏,导致查找时间不确定,平均查找时间变坏,红黑树利用节点的颜色规则通过旋转保持了树的相对平衡

插入修复的示意图如下:

在节点插入时,总共有如下几种情况:

  1. 树空
  2. 父黑
  3. 父红,叔红,自己左
  4. 父红,叔红,自己右
  5. 父红,叔黑,自己为右
  6. 父红,叔黑,自己为左

插入的修复算法只要针对以上情况进行处理即可:处理规则如下,设p为新增节点指针:

1
2
3
4
5
6
7
8
while(true){
1. 树空 -> p节点变黑,root=p,返回root
2. 父黑 -> 不违反红黑树规则,返回root
3. 父红,叔红,自己左 -> 祖父变红,父叔变黑,将当前处理节点指针p指向祖父
4. 父红,叔红,自己右 -> 同3
5. 父红,叔黑,自己为右 -> 以父为处理节点p,以父左旋
6. 父红,叔黑,自己为左 -> 父变黑,祖父变红,以祖父右旋
}
  • 可以看出,插入调整的大原则就是,哪边的节点多,就往另一边转一下,但并非每次都转(如规则2),确保平衡的同时减少树的调整次数
1
2
3
4
5
6
7
8
9
10
11
12
13
14
15
16
17
18
19
20
21
22
23
24
25
26
27
28
29
30
31
32
33
34
35
36
37
38
39
40
41
42
43
44
45
46
47
48
49
50
51
52
53
54
55
56
57
58
59
60
61
62
63
64
65
66
67
68
69
70
71
72
73
74
75
76
77
78
/**
* 需要修复的4种情况
* 1、新插入的是根
* 2、新插入的node父是红,叔叔红
* 3、新插入的node父是红,叔叔黑,node是左子
* 4、新插入的node父是红,叔叔黑,node是右子
*
* @param root
* @param node
*/
static TreeNode repairColor(TreeNode root, TreeNode node) {
TreeNode me = node, parent, grand, uncle;
//自己的父亲是红持续循环
while (true) {
parent = me.parent;
if (parent == null) {
me.red = false;
return me;
}
grand = parent.parent;
if (!parent.red || grand == null) {
//grand为空父亲节点为root,其一定黑不需要处理
return root;
}
if (parent == grand.left) {
//父亲是爷爷左
uncle = grand.right;
if (uncle != null && uncle.red) {
//叔叔节点是红色
parent.red = false;
uncle.red = false;
grand.red = true;
me = grand;
} else if (me == parent.right) {
//叔叔黑且自己是右边
me = me.parent;
root = rotateLeft(root, me);
} else {
//叔叔黑自己在左边
parent = me.parent;
if (parent != null) {
grand = parent.parent;
parent.red = false;
if (grand != null) {
grand.red = true;
root = rotateRight(root, grand);
}
}
}
} else {
uncle = grand.left;
if (uncle != null && uncle.red) {
//叔叔节点是红色
parent.red = false;
uncle.red = false;
grand.red = true;
me = grand;
} else if (me == parent.left) {
//叔叔黑且自己是左边
me = me.parent;
rotateRight(root, me);
} else {
//叔叔黑且自己是右边
parent = me.parent;
if (parent != null) {
grand = parent.parent;
parent.red = false;
if (grand != null) {
grand.red = true;
root = rotateLeft(root, grand);
}
}
}
}
}
}

3.3 方便调试的代码

1
2
3
4
5
6
7
8
9
10
11
12
13
14
15
16
17
18
19
20
21
22
23
24
25
26
27
28
29
30
31
32
33
34
35
36
37
38
39
40
41
42
43
44
45
46
47
48
49
50
51
52
53
54
55
56
57
/**
* 打印树状图方便调试
*
* ROOT-B_3
* +-------R-B_5
* | +-------R-R_7
* | | +-------R-B_8
* | | | +-------R-R_9
* | | +-------L-B_6
* | +-------L-B_4
* +-------L-B_1
* +-------R-B_2
* +-------L-B_0
* @param root
*/
static void showTree(TreeNode root, int level, String leftRight, boolean isRight) {
TreeNode p = root;
if (p != null) {
//右子树节点输出首个竖线
if (isRight) {
System.out.print("|");
}
if (level > 0) {
for (int i = 0; i < (level - 1) * 9; i++) {
//第一次不输入竖线,第三层开始输出,每隔8个空格输出一个竖线
if (level > 2 && i > 0 && i % 9 == 0) {
//最后一个恰好无法满足取余,所以叶子节点不会输出竖线
System.out.print("|");
}else{
System.out.print(" ");
}
}
System.out.print("+");
//输出节点树枝
for (int i = 0; i < 7; i++) {
System.out.print("-");
}
}
//标识左右与黑白
System.out.print(leftRight + (p.red ? "-R_" : "-B_") + p.value);
System.out.println();
//只有根节点右边的子树输出竖线,此处判断节点时候是右侧子树
TreeNode check = p;
boolean right = false;
while (check.parent != null && check.parent.parent != null) {
check = check.parent;
}
if (check.parent != null && check == check.parent.right) {
right = true;
}
showTree(p.right, level + 1, "R", right);
showTree(p.left, level + 1, "L", right);
}
}

4. 删除

  • 删除较为复杂,核心思想点就是,如果删除的是黑色节点,那么删除节点替补节点及其子树少了一个黑节点,想办法补充一个(增加一个,或兄弟节点子树减少一个)

二叉搜索树删除节点p的方法:

  1. 如果p是叶子只有一个儿子节点,直接将其儿子或nil链接给父
  2. p有双儿子,从左子树找到最大值节点y,将y.value赋给p.value, y的左子树链接至y.parent,此时y被删除

红黑树节点删除:

  1. 节点的删除与普通二叉搜索树相同
  2. 如果删除的是黑节点,可能破坏了规则5,那么需要调整修复颜色

红黑树节点删除调整颜色的CASE如下,x表示删除节点的替换节点,即其左子树或右子树:

1
2
3
4
5
6
7
8
while(true){
1. x为根或为NULL -> 变黑返回
2. x红 -> 变黑返回
3. x黑,兄红-> 兄变黑,父变红,以父左旋,更新兄弟节点
4. x黑,兄黑,兄二子黑 -> 兄变红,更新x=x.parent
5. x黑,兄黑,兄右子红 -> 兄为父色,兄右子黑,父黑,父左旋
6. x黑,兄黑,兄左子红,右子黑 -> 兄红,兄左子黑,以兄右旋,更新兄弟节点
}

请观察图,其本质都是平衡删除节点左右的黑节点数量

4.1 删除节点

两个版本的删除节点方法,第一个更易读一些:

1
2
3
4
5
6
7
8
9
10
11
12
13
14
15
16
17
18
19
20
21
22
23
24
25
26
27
28
29
30
31
32
33
34
35
36
37
38
39
40
41
42
43
44
45
46
47
48
49
50
51
52
53
54
55
56
57
58
59
60
61
62
63
64
65
66
67
68
69
70
71
72
73
74
75
76
77
78
79
80
81
82
83
84
85
86
87
88
89
90
91
92
93
94
95
96
97
98
99
100
101
102
103
104
105
106
107
108
109
110
111
112
113
114
115
116
117
118
119
120
121
/**
* 删除节点
*
* @param root
* @param t
*
* @return
*/
static TreeNode delete(TreeNode root, TreeNode t) {
TreeNode y = t;
TreeNode next;
if (y.left == null || y.right == null) {
//叶子节点或只有一个儿子节点
next = y.left == null ? y.right : y.left;
if (y.parent == null) {
//y是root更新root
root = next;
} else {
//将next链接在父亲的左右
if (y.parent.left == t) {
y.parent.left = next;
} else {
y.parent.right = next;
}
}
//链接next父
if (next != null) {
next.parent = y.parent;
}
//删除的节点黑,修复颜色
if(!y.red){
root=repairDelete(root,next);
}
return root;
}
//双儿子不为空
TreeNode searchPoint;
next = y.left;//next初始化为左节点
//找到左子树的最大值作为新的t值
while ((searchPoint = next.right) != null) {
next = searchPoint;
}
//此处只有可能next的左子树不为空,上循环已经循环了右子树
TreeNode x = next.left;
//将next的左链接在next的父左或右
if (next.parent.left == next) {
next.parent.left = x;
} else {
next.parent.right = x;
}
//链接x的父
if (x != null) {
x.parent = next.parent;
}
//交换值
t.value = next.value;
//删除的节点黑,修复颜色
if(!next.red){
root=repairDelete(root,x);
}
return root;
}
/**
* 简化版本的删除节点方法,不易读
*
* @param root
* @param t
*
* @return
*/
static TreeNode deleteSimple(TreeNode root, TreeNode t) {
TreeNode y;
if (t.left == null || t.right == null) {
y = t;
} else {
//双儿子不为空,寻找替换点,左子树最大值
y = t.left;//y初始化为左节点
TreeNode searchPoint;
//找到左子树的最大值作为新的t值
while ((searchPoint = y.right) != null) {
y = searchPoint;
}
}
TreeNode x;//x标识y的左子树或者右子树,当y为t时,x就是需要t的直接子树,否则,x是左子树最大值点的左子树
if (y.left != null) {
x = y.left;
} else {
x = y.right;
}
if (x != null) {
x.parent = y.parent;
}
//此种方法共享了y作为两种情况的操作指针,即最多一个子树的t本身与有双子树的左子树最大值节点
if (y.parent == null) {
//y的父为空,其为Root,直接将x赋予root,此时若x为空,标识左右子树都是空,此时只有一个y节点
root = x;
} else {
if (y.parent.left == y) {
y.parent.left = x;
} else {
y.parent.right = x;
}
}
//y!=t表示此时y指向了左子树最大值节点而不是t本身
if (y != t) {
t.value = y.value;
}
if (!y.red) {
//删除的是黑节点才需要修复,修复节点是y的左子树或右子树,违反规则只会在x及其子树上
//这里考虑的是影响性质5
root = repairDelete(root, x);
}
return root;
}

4.2 删除节点后的修复

修复详细代码:

1
2
3
4
5
6
7
8
9
10
11
12
13
14
15
16
17
18
19
20
21
22
23
24
25
26
27
28
29
30
31
32
33
34
35
36
37
38
39
40
41
42
43
44
45
46
47
48
49
50
51
52
53
54
55
56
57
58
59
60
61
62
63
64
65
66
67
68
69
70
71
72
73
74
75
76
77
78
79
80
81
82
83
84
85
86
87
88
89
90
91
92
93
94
95
96
97
98
99
100
101
102
103
104
105
106
107
108
109
110
111
112
113
114
115
116
117
118
119
120
121
122
123
124
/**
* 修复删除后问题
*
* @param root
* @param x
* 删除时候的替换节点
*
* @return
*/
static TreeNode repairDelete(TreeNode root, TreeNode x) {
TreeNode xParent, brother;
while (true) {
if (x == null) {
return root;
}
if (x.red || x == root) {
//x节点是红色,或者x就是根,直接变黑
//删除x的父之后,表示这一个分叉少了一个黑节点
//如果此时x是红色,则直接将其变黑,相当于补充了一个黑节点
x.red = false;
return root;
}
if ((xParent = x.parent).left == x) {
//x自己是左边
brother = xParent.right;
if (brother != null && brother.red) {
//兄弟红,此时父亲一定黑
//兄弟变黑,父变红,以父左旋
//相当于去掉右侧子树的一个黑节点,同时左侧不加黑节点
// (父原本在右子树的路径上,但是变了红成为了左子树,兄弟变黑但是变成了父)
brother.red = false;
xParent.red = true;
root = rotateLeft(root, xParent);
//此时x的兄弟为旋转之前的兄弟节点左子,更新为当前父右子
brother = (xParent = x.parent) == null ? null : xParent.right;
}
if (brother == null) {
//兄弟节点为空,将调整的节点
x = xParent;
} else {
//兄弟不为空且黑
TreeNode broLeft = brother.left, broRight = brother.right;
if ((broLeft == null || !broLeft.red) && (broRight == null || !broRight.red)) {
//二黑侄,bro直接变红
//同样的原理,右边减少一个黑节点
brother.red = true;
//如果xParent为红,下一轮直接黑,如果为黑,继续循环
x = xParent;
} else {
if (broRight == null || !broRight.red) {
//右子为空或者黑色,左子定为红,则左子变黑,兄弟标红,以兄右旋
brother.red = true;
broLeft.red = false;
root = rotateRight(root, brother);
//更新兄弟
brother = (xParent = x.parent) == null ? null : xParent.right;
}
if (brother != null) {
// 此时右子为红色,否则进不来此处,
// 同时兼容上一个循环右旋之后的新兄弟节点,其右为红,处理方式一样
// 兄弟右子为红,兄弟继承父亲颜色,父亲变黑,右儿子变黑,以父左旋
brother.red = xParent.red;
if((broRight=brother.right)!=null){
broRight.red= false;
}
xParent.red = false;
root = rotateLeft(root, xParent);
x = root;
}
}
}
} else {
//上边if的方向翻转
//x自己是右边
brother = xParent.left;
if (brother != null && brother.red) {
//兄弟红,此时父亲一定黑
brother.red = false;
xParent.red = true;
root = rotateRight(root, xParent);
//此时x的兄弟为旋转之前的兄弟节点右子,更新为当前父左子
brother = (xParent = x.parent) == null ? null : xParent.left;
}
if (brother == null) {
//兄弟节点为空
x = xParent;
} else {
TreeNode broLeft = brother.left, broRight = brother.right;
if ((broLeft == null || !broLeft.red) && (broRight == null || !broRight.red)) {
//二黑侄,bro直接变红,此时x与bro父有可能为红,所以x为x父,进行继续调整
brother.red = true;
x = xParent;
} else {
if (broLeft == null || !broLeft.red) {
//左子为空或者黑色,则右子变黑,兄弟标红,以兄左旋
brother.red = true;
broRight.red = false;
root = rotateLeft(root, brother);
//更新兄弟
brother = (xParent = x.parent) == null ? null : xParent.left;
}
if (brother != null) {
//兄弟左子为红,兄弟继承父亲颜色,父亲变黑,左儿子变黑,以父右旋
brother.red = xParent.red;
brother.left.red = false;
xParent.red = false;
root = rotateRight(root, xParent);
x = root;
}
}
}
}
}
}

统计学习方法概论

1、机器学习<=>统计机器学习

2、统计学习的基本假设:同类数据具有一定的统计规律性

3、统计学习的目的:预测与分析

4、统计学习方法:监督学习,非监督学习,半监督学习,强化学习

5、评估模型,损失函数

(1) 0-1损失函数:
$$L(Y,f(X))=\begin{cases}1& \text{Y$\neq$f(X)} \\0& \text{Y=f(X)}\end{cases}$$
(2) 平方损失函数:
$$L(Y,f(X))=(Y-f(X))^{2}$$
(3) 绝对损失函数:
$$L(Y,f(X))=|Y-f(X)|$$
(2) 对数损失函数:
$$L(Y,P(Y|X))=-\log P(Y|X)$$

6、经验风险,数据量很小时,经验风险最小化效果差,会产生过拟合

$$R_{emp}(f)=\frac{1}{N}\sum_{i=1}^NL(y_i,f(x_i))$$

7、结构风险

$$R_{emp}(f)=\frac{1}{N}\sum_{i=1}^NL(y_i,f(x_i))+\lambda J(f)$$

λ为罚项,权衡经验风险与模型复杂度
J(f)为模型复杂度,模型越复杂越大

8、模型选择,模型复杂度提升,测试误差会先降低后上升,最终目的使得测试误差最小

模型复杂度与测试误差关系

正则化(奥卡姆剃刀原理)
交叉验证(简单交叉,S折交叉,留一交叉)

9、泛化误差=训练误差+关于N的单调递减函数

$$R(f)\leq+\varepsilon(d,N,\delta)$$ $$\varepsilon(d,N,\delta)=\sqrt{\frac{1}{2N}(\log d+\log \frac{1}{\delta})}$$

10、分类问题几个基本概念

  • TP-正预测为正
  • FN-正预测为负
  • FP-负预测为正
  • TN-负预测为负
    精确率:$$P=\frac{TP}{TP+FP}$$ 召回率:$$P=\frac{TP}{TP+FN}$$